Archive
A Practical Architecture for WCF – Part 3
This is the third article in our WCF practical architecture series. Part 1 is here, and part 2 is here.
At a certian point, setting up a WCF environment moves you away from programming and more toward networking. That is what this article is going to cover, how to setup a WCF client on IIS7 using the net.tcp protocol. We will be crossing machine and domain boundaries and will be suggesting a starting point for a secure environment.
We are going to do two things in this post
- Configure your local development machine to host a service in IIS7
- Configure a seperate server to host a service in IIS7 and to recieve what you push from your local development machine.
First, lets get service hosting done on your local machine so you have something to push to your application server. Right click on your solution and then Add and then New Web Site. Then select WCF Service as shown in the image below. I choose the name CheeseListIISHostedServices. It’s important now to pick the name you will be living with because I am recommending that this name not only be the name of your local environment, but the name of the new A record you will create to point to your application server.

Then in the AppCode folder delete the IService.cs and Service.cs files as you won’t need them because you have a seperate service layer. Next, right click your site and click on Add new ASP.NET folder, then click on Bin.
Change the name of the Service.svc folder to the name of your service. Since my service is called BrandServices, I renamed it to that. Then you will want to go into the svc file and change the Service attribute. Make sure that you include the namespace of your service too. Look at the image below for how I named my Service attribute in the svc file.

Notice in the image above that the location has been removed from the original Service.svc. We will not need this as we are going to establish a reference to the project that contains the services. To establish a reference, right click on the web site and then click on Add Reference. Go to the projects tab and then click on the project that has your services. In this instance for me it is CheeseListServices as shown in the image below.
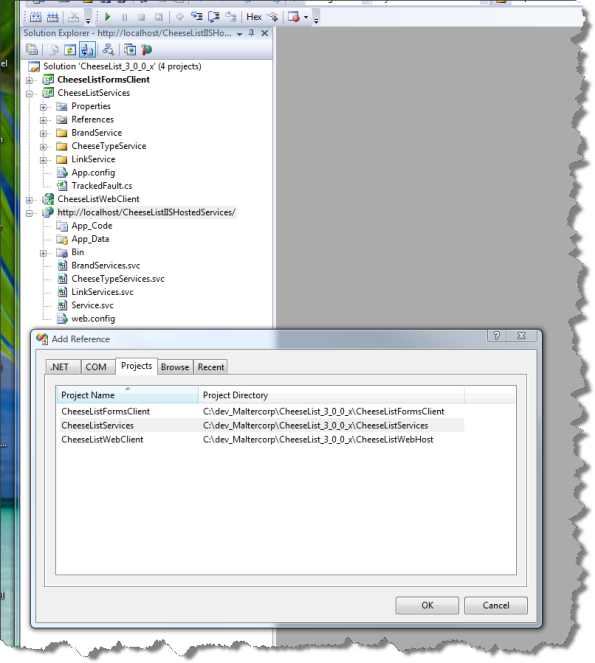
When you click on ok, your Bin folder will get filled up with all of the referenced dll’s in your service project including your newley created services dll. Then, after a few more configuration details, you’ll have something to push out to your real services environment.
The next step is to configure the web.config file. The two things to remember about the web.config file supporting services. First it functions as the config file for the modules from the site we are wrapping with services, so all of its settings should be there, and we also have the services section. Let’s take a look at the system.serviceModel section in the web.config in the figure below to look at how to configure our service for net.tcp and to be discoverable.

You can copy and past what is here and change the names to fit your names. In the bindings section we have a netTcp binding tag. There is more here than is necessary, but this binding section will support transactions and a certian level of security. So for now just to get this running, this can be copyed and pasted.
In the services section we have three services, but two of them are collapsed because we won’t need them now, but we will later. In the service for Brand services we set our binding protocol to net.tcp and we also included a few endpoints. The mex endpoint is used by the client to generate service metadata.
Since we are not using http but net.tcp as the service protocol, we cannot put the mex endpoint address into a browser and read the file, but we will be using the WCF Test Client to make sure our setup is working. Normally, I never use the WCF Test Client because I’ll always have a client around with some sort of functionality to get myself off of the ground. But I didn’t want to make you wait until we got done with the client to see if you had set up your services correctly. So we are using the client here. This part of the series is pretty long as it is.
Finally in the config is the behavior section. In the serviceBehaviors tag we have additional information for our service. You can cut and paste here too making sure that you have your service name correct.
Next, please check to see if your default web site has a net.tcp binding type. To check it, click on the default web site and then right click and then click on Edit Bindings. You should see net.tcp for port 808:*. If you don’t, click on the add button and add it. Later on in this post, we go into setting up bindings on IIS7 on Windows Server 2008. Anyway, when you setup IIS7 on your workstation, all bindings should have been created by default.
Ok, we are getting really close to fireing up our service. We just have to get the address of our service to feed to the WCF Test Client and then we are good to go. Here is how to do that. In IIS7, click on the website that is hosting your services and then in the center pane at the bottom click on Content View. Then find the svc file for your service, click on it and then click on browse. You should get something in your browser like the figure below.

If you got this, you are really in good shape, that means your site is setup correctly and you do not have any gross errors in your config file. What you want is the address up close to the top right after svcutil.exe. Copy and then pull up the WCF Test Client at C:\Program Files\Microsoft Visual Studio 9.0\Common7\IDE\WcfTestClient.exe. When you get it up, click on File and then Add Service. Past the address into the end point address edit box like the figure below.
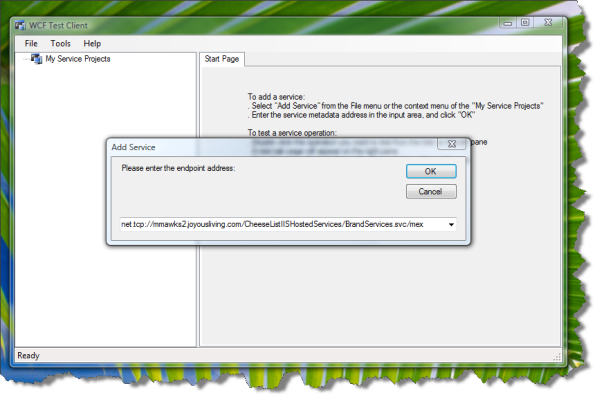
Then click on OK and after a bit you should see a dialog box appear with a progress bar saying “Adding”. When finished you should see your service under My Service Projects along with the service method. In the figure below, you can see my ListAll() method. I clicked on the listAll() method and then got a ListAll panel on the right. Then I clicked on the Start a new proxy checkbox near the Invoke button and then clicked on the Invoke button and got the result below (click through the security warning).

The results are the return of the BrandList object from the ListAll() service. If you click on the XML tab on the bottom, you can see the Request and Response messages. If you got this far, you are in really good shape. If not, please post your questions and I’ll answer them asap.
The next part of this post explains how to create an application server using IIS7 and the net.tcp protocol in your enterprise.
Every enterprise has its own security requirements and what configuration is necessary to meet those requirements. So, this article is not intended to be then end all and be all of security, however, for traffic within your LAN, it is my opinion that what we are talking about here will be reasonably secure.
Also, as pointed out earlier in this series, we’re not going into all the options available, but are pointing out one simple and practical approach. Resources for a more detailed discussion of options are here.
Ok, now on to the client. WCF services can either self host, or use IIS. We are going to look at how to host WCF Services with IIS7. We are also going to be using the net.tcp protocol to do it. The reason to use net.tcp is that by doing so you can expose your services equally to a web site or to a windows forms application. You can do it using http or https, but net.tcp is much faster, and although it is a little harder to configure, it is really worth it.
What we are doing here is to setup the service on its own machine and with its own domain. First thing is to create the DNS domain internally. The default domain on our network is joyousliving.com and we also use maltercorp.com equally. The Windows domain name is joyousliving.com. We also have a number of other domains as we host and do development for clients. We created a new domain called maltercorplabs.com and are using it for hosting services. However the windows forms desktop client is on the joyousliving.com domain. Below is a screenshot of the maltercorplabs.com domain after it was configured with the cheeselistiishostedservices A record.

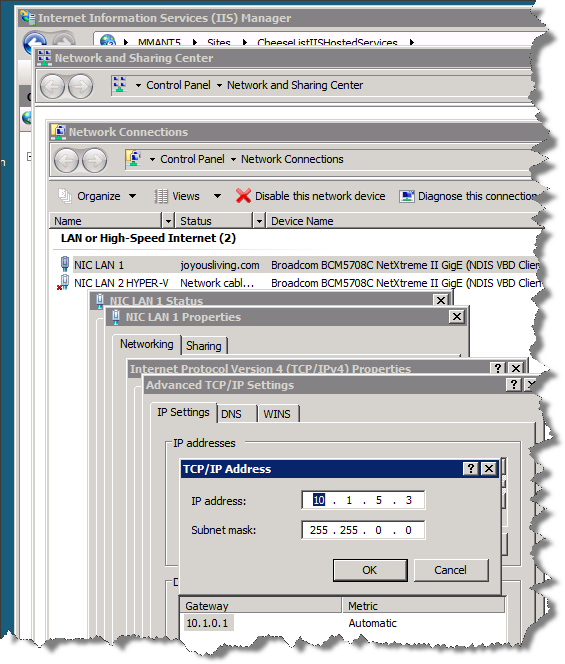
The next step is to create the site on IIS7 that will do the hosting. To that, first you have to add the IP address you want to use for the site into your NIC configuration. I never use the default web site, and always add additional IP’s for each website I need. The screen shot below shows the configuration of the NIC.
To get there you go to Control Panel / Network Connections and click on the NIC you want to configure. Then click on the properties button and then on the Internet Protocol Version 4 item. Then click on the advanced button and on the top of the dialog box, you’ll see IP addresses. Add the IP there. Aftering adding the IP, make sure you can ping it from your workstation using the fully qualified domain name you setup in the DNS Manager. In this case it is CheeseListIISHostingServices.MaltercorpLabs.com.
Next, create the actual site. My convention is to create a site name that is the same as the A record I created. Under binding make sure you pick the new IP Address you created and leave the rest to default values. We are going to go back and change a few things.
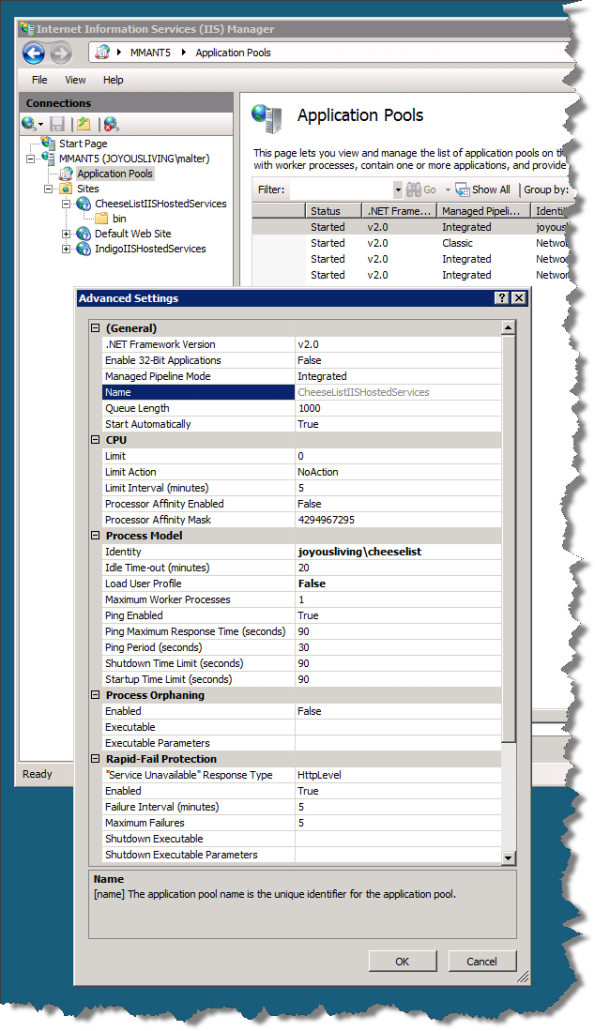
After creating the website, create an application pool where the Managed Pibeline Mode is Integrated. Now comes the fun and controversial part. I change the identity in the Process Model section from the NetworkService to something else. That identity is a regular windows login for each application. Users don’t know anything about it, it’s purpose is to be an administrative or application service account. This account is used as the identity of the website as well as the login to the database. We use an SSPI login to talk to the database so we don’t have to embed a login id and password into the web.config.
So, lets talk about this for a bit. What I want to do as an architect is balance security with maintenance and prevent deployment errors. So, I have at least three and sometimes 4 environments. Each environment will have a complete set of machines; database, web and or services.
- Development
- Integrated Unit Test
- QA
- Production
For each application in each environment, I will create a windows login. In each database I create a database role and then assign the application service account to that role. Each environment has the same database role, but each environment will have a different application service account. This makes it very easy to migrate database changes between environments; from dev to IUT to QA and then to production. I don’t have to make any manual changes to any script because I am granting permissions on the role in the database.
Then in any web environment where I am using SSPI logins, the identity in the application pool is what is used to login into SQL Server. Sometimes when moving scripts around, it is possible and likely that you will at one time or another, you will point to a database in the wrong environment. However having a different application service account for each environment will cause an exception to be thrown and you’ll know immediately that the name of the server is wrong.
The reason you need to care about the database login for the service is that we are wrapping an existing website’s dll’s and they need a way to login to the database. You could if you wanted create a different application service account to be used by services from the one used by the website. It does not matter as long as that user gets added to the appropriate database role in the right database and it is the same as the identity in the application pool.
It may seem like a lot of work to create so many users and to do this extra configuration, but you will be glad you did the moment your development process comes under stress. Its much better to see an immediate error telling you that you tried to get into the wrong database, than to realize that you have been pointing to the wrong database and now your data is screwed up, not to say what will happen with your credibility with the users having to re-enter data and trying to remember what they did.
So, right click on the new application pool and then click on advanced settings and change the name of the Identity to your application service account as shown in the image below.
After changing your site’s identity, you need to add a binding to support net.tcp. So, right click on the website that you are going to use to host the service and click on Edit Bindings. Then click on the Add button, and like the image below shows, select net.tcp from the dropdown and enter a port number followed by an asterick. I choose 808:*. then click ok.
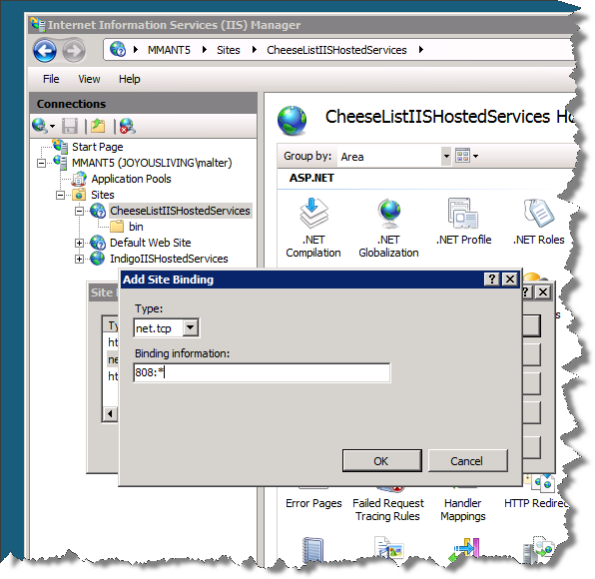
Now the website is setup with its own application pool and custom binding and is ready to be published to. So, lets put our programmer’s hat back on and open Visual Studio. We want to change the base address and point to the website we just set up, so change it from localhost. In my case the new address is net.tcp://CheeseListIISHostedServices.MaltercorpLabs.com/. Once you are done with the configuration changes, then go ahead and publish to your new server. You can test it just like you did when you were getting services to run for the first time on your local machine.
Ok, that is it for this part. There was a lot here, and I know this piece stayed pretty high level. Remember there are WCF Learning Resources here on the Computer Mutt. Also, if you have any questions, post them and I’ll answer them ASAP. Next up we will create a web and windows forms client. After that we will dive into transactions and then to exception handling.
A Practical Architecture for WCF – Part 2
This article follows A Practical Architecture for WCF – Part 1.
Whew, well finally (no really) some code!
I created an empty solution called CheeseList_3_0_0_x and created all of my projects inside of it. Call it whatever you want. In my solution I created a project for my services called CheeseListServices and then created three services, one each for Brands, CheeseTypes and Links.
I structured my project so that each service was in its own folder. I did this so that nothing happens by default. What I mean by that is that all the examples presented by books and blogs just show one service, but, most projects will have more than one service and it took me a long time (blush) to figure out how to do this in an industrial strength way, so I am starting you out that way in the beginning.
The steps to do this after creating your blank solution is to highlight the solution and then add and then new project. Since we are coding in C# here, under the Visual C# header in the Project types list click on WCF and then click on WCF Service Library. I named mine CheeseListServices.
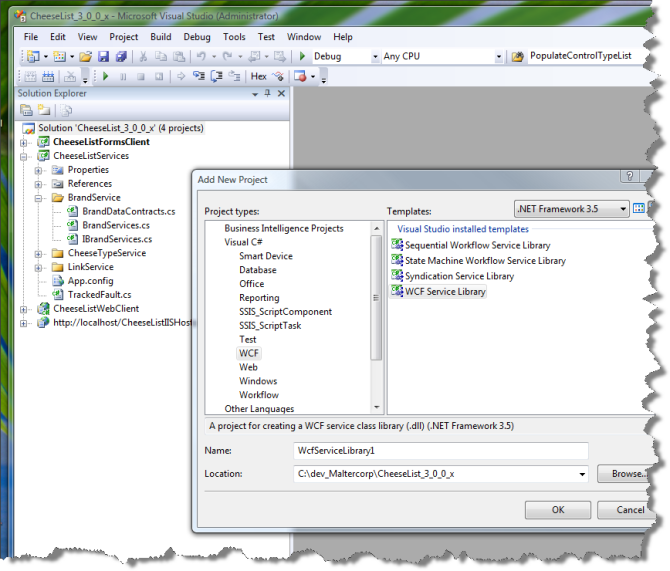
After creating your Service project, please delete the Service1.cs and IService1.cs files in the root of the project that were created by default. Leave App.config alone for now. Then, create a few folders for your services. We are mostly going to only use one, but the other services will have one or two methods in them so you can tell for sure that everything is setup correctly and what you are calling is actually answering. After you have created your folders, create the services you’ll be using, one service to a folder so that everything that relates to that service is in one place.
To create your services, click on the folder in your services project and then goto add and then new item. In the Templates window click on WCF Service. Give it a name that makes sense to you.

You’ll notice that only two files were created, one will house service interfaces and the other will house the actual services. We are going to need to add a third for data contracts.
In your references section add a reference to System.ServiceModel and make sure that you have a using statement for it in all of your services files. In addition, since I am wrapping an existing website I also added references to my datalayer, businesslayer and common dll’s from that project. The next step is to create the data contract to support your first example.
I chose the most simple, non-transactional, routine with no parameters I could think of to start small and that was to return a list of all brands. The business layer of the site has a brand object with a ListAll() method with no parameters, so this is my starting point. I would pick something very simple with no parameters or transactions and that returns something simple, like a list.
My data contracts for BrandServices is in a file called BrandDataContracts.cs. At this point please create a data contract that will contain the types in your service. Lets take a look at a snippet of code from my data contracts file for the Brand service, and walk through what is there and why. Basically I am going to want to return a list of brands that will contain an numeric ID of a brand and a label. There is much more to this file that we will go through later.
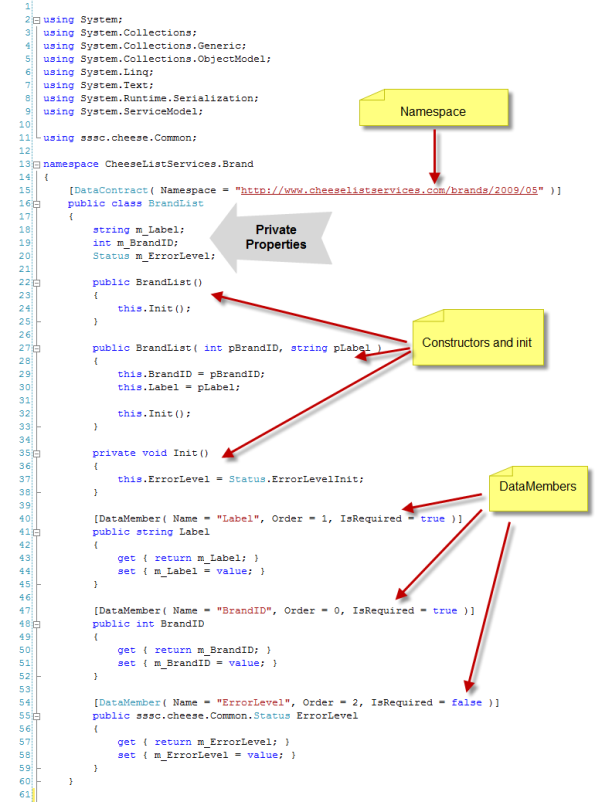
Let’s take a look at what we did.
We created an object called BrandList and decorated it with the DataContract attribute. And as a parameter to that attribute, we are providing a string that is formatted with the URL of the service, the service type and then a year and a month. This string will uniquely identify the service in metadata so think this through carefully as it will be very helpful to have something structured that will allow you to uniquely identify your data contracts as well as something that can indicate when they were created.
Next we have our private properties just like any object. Here we created properties for a brand id, a label and an error level.
For constructors, we are allowing the creation of an a BrandList object with or without parameters. Each constructor is also calling an init method we will use to set default and other values. In this case we are setting the default value of the error level to an init status – that is neither success or fail.
In the public properties section, we are exposing our private properties through get/set variables and then are decorating each with a Name, Order and IsRequired. This decoration is important because it is used in meta data when the objects properties are exposed. If you do not list an order, properties will be displayed in alpha order which may not be the best way. IsRequired is important because if something is set as IsRequired equals true and it is not present, an exception will be thrown. When IsRequired equals false, the variable is optional.
That’s it – we have created our first data contract. Now lets go and write the service.
Open the interface file for your service. In my case its IBrandServices.cs. We are going to create an interface for our Brand service and will expose a method to list all brands, or ListAll(). Please refer to the image below.

Lets look at what we did and why.
In our namespace, it’s just like before with our data contract with one difference. In this case we are creating a Service Contract.
The one method we want to expose at this point in our service will be that list of all brands, so here we create an interface for a ListAll() method that returns a List<BrandList>. The BrandList type in our List<> is the object we created in our data contract.
Next, lets create the actual service. In my case I created a BrandServices.cs file. Let’s take a look and see what was done.
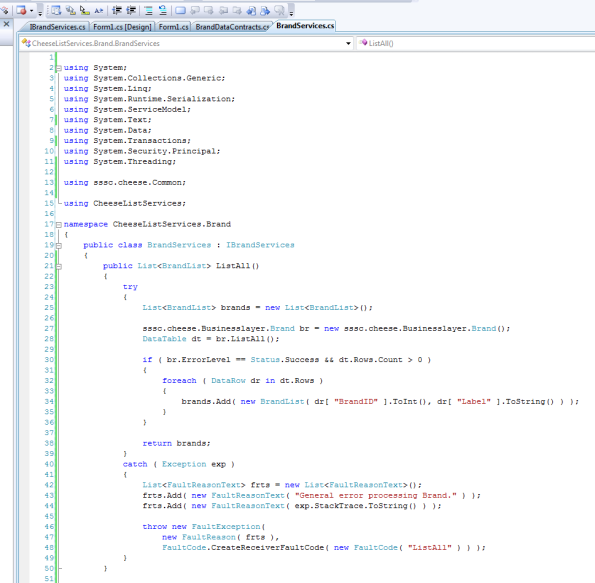
We created a public object called BrandServices and derived it from our interface IBrandServices. We have one public method called ListAll() that returns a List<BrandList>. The first thing we do is to create a new brand object of type List<BrandList> and then call the ListAll() method in the business layer of the existing web site.
Since that application has been a self contained web site, we used DataTables for passing our data around. This is not a problem because all of the .NET controls can data bind to them. However DataTables will not work for services. We need strongly typed data.
Let’s take a step back for a minute to understand why we need strongly typed data. One of the crown jewels of using WCF to implement services is in the mechanism for a standard in the creation of metadata files that can be consumed by any application using our service, or in a word, interoperability. That is, you could write services in .NET and they can be consumed by a Java app or vice versa. But the calling application must have a way to find your service and then to understand the details of your service, operation, data and fault contracts.
I don’t want to get too deep here as the references linked to the first post in this series cover this in detail, but when we look at the metadata for the return value for the List<BrandList> it is seen as a BrandList[]. One side of the service can use all of its types but as long as they are translated and handled by metadata the calling application can consume them.
One more aspect of types. There is a generic type of collection available in the ServiceModel namespace that you can use instead of List<>. This is valuable because the program using the service may not know what a List<> is but needs a collection it can insert objects into to pass them back to you. We’ll get into this a little later, but if you create a data type based on an ObservableCollection<>, the client can create that type, fill it and send it back.
Ok, back to our code. After checking the error level and row count from the call to the ListAll() method exposed by the original business layer, for each data row in the returned data table, we are creating a new BrandList object and adding it to the brands list. If we do not throw an exception, we return the brands list.
For now I am going to skip exception handling, but will get back to it later after we get this service working. So you can copy and paste my catch block.
Ok, so to review, we created our solution and then created a project to house our services. We created one service that is consuming a method from an existing application and are supporting it with a data contract and an operation contract.
The next step will be to host the service so we can work with it, and we’ll do that in the next article. In that post we will learn how to set up IIS7 to host a service using the net.tcp protocol which is much faster than http and can feed either a website or a windows form application equally well.
A Practical Architecture for WCF – Part 1
This is the first in a series of articles designed to provide an example of a practical architecture for WCF in its support of a services oriented architecture.
We are going to look at how you could take an existing web site and wrap its functionality in services to be consumed by either a web site or a windows forms application. We will show you how to configure your network and servers to offer these services across domains and machine boundaries. We’ll also take a look at how to structure data contracts to provide robust objects and lists of objects across the wire with exception reporting. Finally we’ll look at how to configure support for distributed transactions and some suggestions for structuring projects to make testing and deployment easier.
There are a few references that I recommend using as you are learning WCF and they are posted here on the Computer Mutt. Those resources will address a wider range of WCF concepts much more in-depth than I will here as this article is focused on providing an approach to a particular problem, and not structured to review all options that are available. Michelle Leroux’s introduction in the chapter on working with WCF in Visual Studio 2008 which covers SOA and WCF is total gold, and every time I re-read it I get something out of it.
Ok, let’s take the first step look at what we have and what we want to wind up with. We are starting out with a current web site that site is a very simple ASP.NET 3.5 public web application in production that provides a list of cheese brands and cheese types that are made without animal rennet. It has discreet layers consisting of a data layer, business layer and presentation layer in the form of web pages. The data layer talks to Microsoft SQL Server 2008 and runs on IIS7 on Windows Server 2008. Everything is 64 bit and everything is on a single box. Basically it is simple running website and thus a good candidate for a first step.
Here is a network diagram showing the current architecture of the website we are going to transform:

The diagram below is what the architecture will look like after we transform it. The differences are that major components are separated by machine boundaries. The database has its own box, services has its own box, and the web site has its own box. On the services box we also have the original business and data layers along with IIS.
Once we transform our original website and began offering services, we are simply serving content to presentation layers both inside and outside of your network allowing you to use either browsers or Windows Forms applications. In the case of a browser, the user points to a URL to get content, in your Windows Forms application, you can configure an endpoint to point to, either way, desktop configuration and support can be much simpler as a result.
Configuring the environment for services behind the firewall is simpler than offering them over the network, and the scope of this series is for services on the inside of the firewall. In a subsequent article, I’ll walk you through the steps necessary to offer secure services over the internet.

We are going to use Visual Studio 2008 with .NET 3.5 along with WCF Services Templates to code services. Development is on a Vista machine. An aside on Vista first. I’ve heard how Vista sucked and to avoid it, however when I switched to developing and supporting ASP.NET apps on Windows Server 2008 & IIS7, I found that using Vista simplified development.
First, Vista uses IIS7 (which is the version on Server 2008) and it understands the web.config files generated by Visual Studio 2008. I can also configure those web.config files once in one place in the file, unlike developing on XP where you have to configure the same thing in several places in the file. Yes, UAC blows, but you can turn it off and I have had no problems using it. I’m not advocating that you switch from XP if you want to develop services to run on Windows Server 2008, I’m just passing along that I found with Vista I created a less error prone development environment.
One last word on environment. While you will be able to do everything in this series of articles on one machine, it will work out better for you in the long run if you have an Active Directory environment with at least three dedicated boxes; Web, Services, Database. If you have limited equipment, consider creating seperate environments using Hyper-V. Go to my recent post for help on creating and cloning Hyper-V environments.
I really want to emphasize that it is in your interest to invest the sweat in creating seperate environments to run the examples in this series. The reason is that a lot happens by default when you run everything on a single box and you’ll never realize it until you begin to move things around, and by then you’ll have to spend an undetermined amount of time to backtrack to uncover your mistakes. Also, nobody is really going to be running this stuff on a single machine in a production environment anyway, so you might as well get used to it right off of the bat. If you understand what the network requires to support WCF you’ll be more valuable to your company and customers.
Before finishing this introduction, some thoughts on the Web Client Software Factory (WCSF). This tool will allow you to code WCF services using a visual designer in Visual Studio. One of its strengths is that it forces a particular format on project directory structure which can be advantagous since everyone on the team will be forced to structure their work the same way. I began working in WCF using this tool, and I have to say it was a very confusing time for me as took a lot of effort to understand where the tool left off and WCF began; it was unnecessairly complex.
Furtheremore, once you start a project in the tool and need to make changes, you must go back and make them through the designer. There are some other very severe side effects to. One is that the tool will create directory and filenames that will break Visual Studio and this goes double if you are using Team Foundation Server. Having outlined some of my concerns, you have to that creating such a tool is a huge accomplishment, and although this tool is just in its beginning stages, over time I am certian refinements will be introduced smoothing out some of its early difficulties.
In my mind it is best to start out simply and do everything manually so you get a clear understanding of what you need to do to support WCF services.
Next up – A Practical Architecture for WCF – Part 2 which will demonstrate the creation of services.
Recent Comments