Archive
Cloning Virtual Machines using Hyper-V Without the Pain
This post will explain how to create and then clone virtual machines using Microsoft’s Hyper-V virtual machines. There are a few speed bumps you may encounter along the way that are helpful to know of in advance, and we’ll cover an approach to get over them.
I have been a long time user of VMWare for creating virtual machines, but, I ran into problems with hosting Microsoft’s ISA Server inside of a VMWare virtual machine. With the release of Windows Server 2008 and Hyper-V the story is different now. Microsoft supports ISA Server and their beta ISA Server product called TMG (Threat Management Gateway) in a virtual machine environment. See: http://technet.microsoft.com/en-us/library/cc891502.aspx and http://www.subodh.com/Blog/EntryId/47/Running-ISA-Server-2006-under-Hyper-V.aspx and finally Jim Harrison’s presentation on virtualizing ISA at http://edge.technet.com/Media/Virtualize-your-ISA-or-Forefront-TMG-servers/. Now it is possible to model an entire network along with ISA Server inside virtual machines. Additionally, the cloning of virtual machines, although a manual process, is sustainable.
That is the good news, however there are two gotcha’s:
- SID creation
- Mouse not captured in Remote Desktop Session
Let’s look at solving SID creation problems first, since that is the last thing I worked with and is freshest in my mind. If you are running stand alone machines, and are cloning from a parent virtual machine or vhd file, all of your vm’s will have the same SID. This is not a problem for you. If, however, you need to clone vm’s and then join a domain, you will have problems if you do not create a unique SID for each VM.
One way to do this is to use Microsoft’s sysprep tool, the other is to use a tool called NewSID located here http://technet.microsoft.com/en-us/sysinternals/bb897418.aspx, which the rest of this post will cover. There are some problems that the SYSPREP tool has as is reflected in this Microsoft Knowledgebase post: http://support.microsoft.com/kb/954356.
I choose NewSID because it only does two things; generates a new SID and renames the machine. And, that is all I need. If you have other requirements, SYSPREP is the way to go.
Ok, gotcha one. You will need to check for a specific registry entry in your seed virtual machine that will throw NewSID into an infinate loop which will cause it to run out of resources and crash. You need to see if you have the following registry key. If you don’t then you can go to the next step. The key to check for is HKEY_LOCAL_MACHINE\SOFTWARE\Wow6432Node\Wow6432Node. The following blog post alerted me to the problem: http://forum.sysinternals.com/forum_posts.asp?TID=14370. After deleting the key in my seed vm, I had no further problems.
The second gotcha involves the creation of a VM using remote desktop; basically, you can’t do it, and in my mind is one of the most lame and frustrating things about Hyper-V. It is simple to create virtual machines using remote desktop with VMWare’s product and I don’t know how Microsoft could have let this out the door without remote desktop support, but they did.
So, you need to be physically in front of your host machine to install Microsoft’s Virtual Machine Integration Services to be able to use a mouse when working with virtual machines remotely. After you create your virtual machine and login, it’s a single mouse click to install these services, but you have to be physically at the console.
Now that the gotcha’s are out of the way here are the steps we will follow in creating a virtual machine in Hyper-V that is clonable.
- Create and configure seed vm.
- Copy the virtual hard disk or vhd file.
- Tweak child.
Before you can use Hyper-V you’ll need to create the Hyper-V role. And, before you create the role, it is important that you have enough physical NIC cards to support it. At least two are preferable. One for remote access, the other to use for the creation of virtual networks. When I created my Hyper-V role, I chose External for the network on my second NIC card which is used for by the virtual machines.
When you create your first vm, my advice is to select the defaults and let the Hyper-V manager put things where it wants to so you can learn where things go.
Before we continue – I am only explaining how to create vm’s with default values just to get you started. After creating your vm and working with it a bit, you’ll need to decide if the file structure is right for you along with naming conventions. I am just interested in providing a very basic orientation to this process to get you up in the air to circle the field a few times and then land.
The first thing to do is to create your virtual hard disk or the vhd file. This file is what will be cloned later. For now, create a new vhd with all defaults intact. To create the vhd file, click on the new link in the action pane on the right hand side at the top. After creating the vhd, then click new again to create a vm that will use the virtual hard disk you just created. Again, use the defaults until you get to connections. Choose the network you created when you created the Hyper-V role. The image below shows where the action menu is to complete these tasks.

After creating the vhd and vm, then click on it in the virtual machines pane in the top center. On the right you’ll see where you can change settings and start and connect. At this point you’ll want to install an OS on your new vm. Put your distrubution CD into the sever and click on start and follow the prompts to install your OS. There are other locations you can use for installing the OS such as a network install point.

After you get the OS installed, login to the machine and install the Virtual Machine Integration Service. To do that, click on the Action menu and select Insert Integration Services Setup Disk. It’s a virtual (what else!) CD that starts up automatically. Again follow the prompts and select defaults. You’ll need to restart the machine after tArehe install. At that point you can leave the console and the vm can be used via remote desktop.

This is the point where you tweak your vm until it is ready to distrubute. One of the items I strongly recommend you add is the NewSID program along with the registry change outlined earlier in the post. Also, one of the things I do with my seed vm is to never run it for general use, but only use it for creating clones and running them.
At this point we are ready to clone the vm. Go to the folder that houses your single vhd file and copy it and then give it a meaningful name. I usually give it the same name as the netbios name of the vm and the physical vm name, something like vm-mmant<n> where <n> is the last octet of the ip address in the subnet I use for my vm’s.

After the copy, create a new virtual machine and give it the same name you used for your vhd. Select the defaults until you get to the networking section and select your virtual network. In the next section, select the “Use an existing virtual hard disk.” It will give it the name of your machine and if your vhd is named the same you have one less step to take and everything ties together. Finish creating the vm and when you are done, click on start in its management section and wait a few seconds until it starts. Then click on connect and login. When the vm comes up, you can click on the Action menu and select the Ctrl-Alt-Delete option and then login.

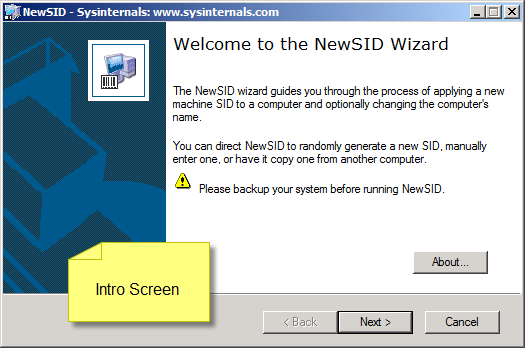
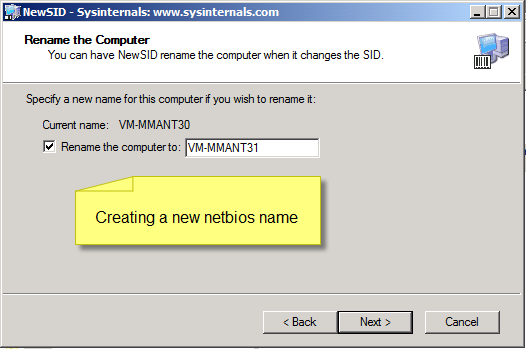
The first thing to do is to change the IP address. Then fire up NewSID and select a new SID and then select a new netbios name for the vm and click ok. In a few minutes NewSID will finish and will reboot the box. When it comes back it will have its new SID, IP address and netbios name. The following images below display the steps in using NewSID to generate a new SID.


When the vm comes back and you login and are happy with the way everything is set up, I recommend that you create a snapshot before adding new roles and features. You can than go back to any snapshot if something gets messed up. Also, when you are done with the vm, you can go back to the original snapshot and use the vm for something else.
I hope that you found this post useful. If you have any questions or suggestions to make any of this more clear, please post and I’ll do my best to answer your questions.
Recent Comments