Archive
Supporting Multiple Dates in .NET Calendar Control
This post will help you to support using multiple dates in a calendar control. You will be able to populate your control with multiple dates from a data source, and then allow your users to interact with those selections, selecting or deselecting additional or existing dates for saving back to your data source.
The calendar control does not support databinding, so you have to use the DayRender event to make your selections appear. You’ll also need to use the SelectionChanged event to manage selections and then some kind of a persistent storage that can live on the page like a session or use the viewstate bag.
So, anything coming in from the database gets handled in the DayRender event, and any changes get handled in the SelectionChanged event. All of this should point to persistant storage such as a session variable or in the view state. When you want to save what the user did, grab whatever you have in your session or view state and send it back to the database.
Here is my html for the control.
<asp:calendar id="cSeminarDate" runat="server" enableviewstate="true"
	daynameformat="Shortest" cssclass="CalendarStandard"
	onselectionchanged="cSeminarDate_SelectionChanged"
	ondayrender="cSeminarDate_DayRender">
	<dayheaderstyle cssclass="CalendarStandardDayHeaderStyle" />
	<daystyle cssclass="CalendarStandardDayStyle" />
	<nextprevstyle cssclass="CalendarStandardNextPrevStyle" />
	<othermonthdaystyle cssclass="CalendarStandardOtherMonthDayStyle" />
	<selecteddaystyle cssclass="CalendarStandardSelectedDayStyle" />
	<selectorstyle cssclass="CalendarStandardSelectorStyle" />
	<titlestyle cssclass="CalendarStandardTitleStyle" />
	<todaydaystyle cssclass="CalendarStandardTodayDayStyle" />
	<weekenddaystyle cssclass="CalendarStandardWeekendDayStyle" />
</asp:calendar>
What I did in this example was to create a session variable to store a List<DateTime>. After populating my list with selected dates elsewhere in code, in the DayRender event (this event fires for every date in the calendar control), I compared the date that the control was currently drawing with my list, and if there was a match, I set the cell’s css class property to my selector style.
The following code is what I am using to populate my calendar control with selected dates.
protected void cSeminarDate_DayRender( object sender, DayRenderEventArgs e )
{
	List<DateTime> dt = SessionManager.GetInstance( HttpContext.Current ).SeminarDateList;
	foreach ( DateTime d in dt )
	{
		if ( d.ToShortDateString() == e.Day.Date.ToShortDateString() )
		{
			e.Cell.CssClass = "CalendarStandardSelectorStyle";
		}
	}
}
After I have my calendar populated with selected dates, my users are now in a position to deselect existing dates as well as to add new dates. The following code below uses the SelectionChanged event in conjunction with the session.
protected void cSeminarDate_SelectionChanged( object sender, EventArgs e )
{
	if ( SessionManager.GetInstance( HttpContext.Current ).SeminarDateList.Contains(cSeminarDate.SelectedDate) )
	{
		SessionManager.GetInstance( HttpContext.Current ).SeminarDateList.Remove( cSeminarDate.SelectedDate );
		cSeminarDate.SelectedDates.Remove( cSeminarDate.SelectedDate );
	}
	else
	{
		SessionManager.GetInstance( HttpContext.Current ).SeminarDateList.Add( cSeminarDate.SelectedDate );
	}

	foreach ( DateTime dt in SessionManager.GetInstance( HttpContext.Current ).SeminarDateList )
	{
		cSeminarDate.SelectedDates.Add( dt );
	}
}
Where you see references to SessionManager.GetInstance( HttpContext.Current ).SeminarDateList, you can replace with Session[“SeminarDateList” ] as I manage my sessions explicitly in a single location. Make sure to remember to clear your session when you init your page. I have an InitUI() method I call if not a postback in the Page_Load event and elsewhere. In there I do this
SessionManager.GetInstance( HttpContext.Current ).SeminarDateList.Clear();
Hope this helps.
Break out of WebForm_DoPostBackWithOptions Hell
I have been going nuts all day trying to get a link button to fire its command event and cause a postback in a GridView control. On this particular page, whenever I click on the link, I get a WebForm_DoPostBackWithOptions instead of __doPostback, and of course I never hit the grid’s command event in my page behind.
The solution? Set causesvalidation=”false” in the link button and the command event will fire. Why, I don’t know, this just works and hopefully you’ll find this post before having to spend too many hours trying to figure it out.
Solve new page flicker in AJAX
Want to stop flickering when going from one page to another in AJAX?
Put the following code in your head section:
<head runat="server">
        <meta http-equiv="Page-Enter" content="BlendTrans(Duration=.05)" />
        <meta http-equiv="Page-Exit" content="BlendTrans(Duration=.05,Translation=0)" />
</head>
For more details about these meta settings, go to http://www.aim-higher.net/meta-transitions.asp.
ASP.NET User Control events tamed through Page_PreRenderComplete
Something that has been bothering me for a really long time is now under control thanks to a blog post in the .NET Geek’s Blog entry on Understanding the Page Life Cycle in ASP.NET. In a nutshell, here is the issue. I prefer to create user controls that wrap standard .NET controls and then put role enabled and other code into the controls. That code determines if the control makes it self visible or disabled along with some other nice to haves.
The problem is that when a page first draws and fires off its events, the user control events follow, and if I come into the page wanting a button to be disabled in certian instances, the user controls resolve their states after the page. So if I have a button in a user control and expose its Enabled property through a get/set variable, I can never make it stick when the page first draws.
In the source code below, I am using the Page_PreRenderComplete event to test for page state and call an appropriate method. In this case the PrepUIforAdd is called and it disables a number of buttons as well other things. If I called PrepUIforAdd in the Page_PreRender event, the buttons would never stay disabled. But calling it in the Page_PreRenderComplete event will result in the outcome I want when the page displays.
		/// <summary>
		/// PreRender is complete
		/// </summary>
		/// <param name="sender"></param>
		/// <param name="e"></param>
		protected void Page_PreRenderComplete( object sender, EventArgs e )
		{
			if ( !Page.IsPostBack )
			{
				ucErrorMessage.Clear();

				switch ( this.CurrentPageState )
				{
					case PageState.Add:
						{
							PrepUIforAdd();
							break;
						}
					case PageState.Edit:
						{
							PopulatePersonInfo();
							PopulateLinkedRoles();
							PopulateUnlinkedRoles();
							break;
						}
				}

				this.ManagePersonTabContainer.ActiveTabIndex = 0;
			}
		}

		/// <summary>
		/// Preps UI for adding a person
		/// </summary>
		private void PrepUIforAdd()
		{
			this.txtPersonID.Text = (PersonIDConstant.Everybody.ToInt()).ToString();

			this.txtLastName.Text = string.Empty;
			this.txtFirstName.Text = string.Empty;
			this.txtLogin.Text = string.Empty;
			this.txtPassword.Text = string.Empty;
			this.txtInceptionDate.Text = string.Empty;
			this.txtLastModifiedDate.Text = string.Empty;
			this.txtLastModifiedByPersonName.Text = string.Empty;
			this.ddActive.YesNoID = 1;
			this.ddDeleted.YesNoID = 0;

			lbRolesAvailable.Clear();
			lbRolesSelected.Clear();

			this.bDelete.Enabled = false;
			this.bNew.Enabled = false;
			this.bResetPassword.Enabled = false;
			this.bRoleLink.Enabled = false;
			this.bRoleUnlink.Enabled = false;

			ddEmailType.Clear();
			List<EmailCollection> dt = GetCachedEmailList();
			if ( this.ErrorLevel == Status.Success )
			{
				ddEmailType.DataSource = dt;
				ddEmailType.DataTextField = "EmailTypeName";
				ddEmailType.DataValueField = "EmailTypeID";
				ddEmailType.DataBind();
			}

			this.txtEmail.Text = GetCachedEmailAddress( PersonIDConstant.Everybody.ToInt(), ddEmailType );
		}
A Practical Architecture for WCF – Part 3
This is the third article in our WCF practical architecture series. Part 1 is here, and part 2 is here.
At a certian point, setting up a WCF environment moves you away from programming and more toward networking. That is what this article is going to cover, how to setup a WCF client on IIS7 using the net.tcp protocol. We will be crossing machine and domain boundaries and will be suggesting a starting point for a secure environment.
We are going to do two things in this post
- Configure your local development machine to host a service in IIS7
- Configure a seperate server to host a service in IIS7 and to recieve what you push from your local development machine.
First, lets get service hosting done on your local machine so you have something to push to your application server. Right click on your solution and then Add and then New Web Site. Then select WCF Service as shown in the image below. I choose the name CheeseListIISHostedServices. It’s important now to pick the name you will be living with because I am recommending that this name not only be the name of your local environment, but the name of the new A record you will create to point to your application server.

Then in the AppCode folder delete the IService.cs and Service.cs files as you won’t need them because you have a seperate service layer. Next, right click your site and click on Add new ASP.NET folder, then click on Bin.
Change the name of the Service.svc folder to the name of your service. Since my service is called BrandServices, I renamed it to that. Then you will want to go into the svc file and change the Service attribute. Make sure that you include the namespace of your service too. Look at the image below for how I named my Service attribute in the svc file.

Notice in the image above that the location has been removed from the original Service.svc. We will not need this as we are going to establish a reference to the project that contains the services. To establish a reference, right click on the web site and then click on Add Reference. Go to the projects tab and then click on the project that has your services. In this instance for me it is CheeseListServices as shown in the image below.
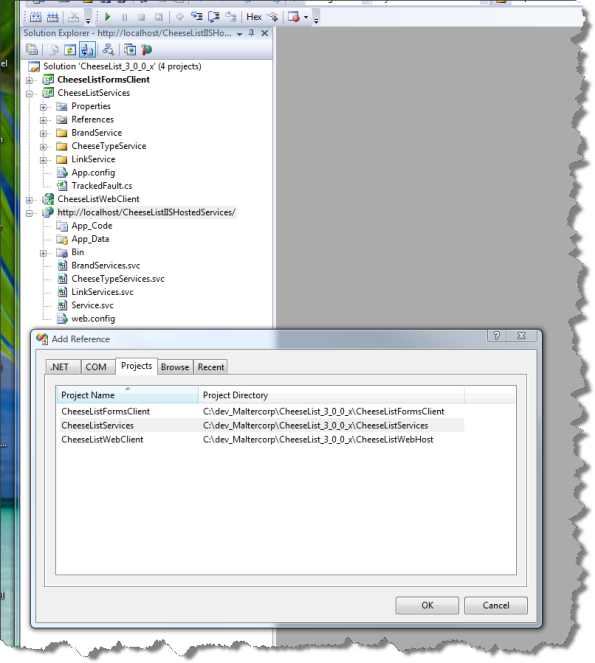
When you click on ok, your Bin folder will get filled up with all of the referenced dll’s in your service project including your newley created services dll. Then, after a few more configuration details, you’ll have something to push out to your real services environment.
The next step is to configure the web.config file. The two things to remember about the web.config file supporting services. First it functions as the config file for the modules from the site we are wrapping with services, so all of its settings should be there, and we also have the services section. Let’s take a look at the system.serviceModel section in the web.config in the figure below to look at how to configure our service for net.tcp and to be discoverable.

You can copy and past what is here and change the names to fit your names. In the bindings section we have a netTcp binding tag. There is more here than is necessary, but this binding section will support transactions and a certian level of security. So for now just to get this running, this can be copyed and pasted.
In the services section we have three services, but two of them are collapsed because we won’t need them now, but we will later. In the service for Brand services we set our binding protocol to net.tcp and we also included a few endpoints. The mex endpoint is used by the client to generate service metadata.
Since we are not using http but net.tcp as the service protocol, we cannot put the mex endpoint address into a browser and read the file, but we will be using the WCF Test Client to make sure our setup is working. Normally, I never use the WCF Test Client because I’ll always have a client around with some sort of functionality to get myself off of the ground. But I didn’t want to make you wait until we got done with the client to see if you had set up your services correctly. So we are using the client here. This part of the series is pretty long as it is.
Finally in the config is the behavior section. In the serviceBehaviors tag we have additional information for our service. You can cut and paste here too making sure that you have your service name correct.
Next, please check to see if your default web site has a net.tcp binding type. To check it, click on the default web site and then right click and then click on Edit Bindings. You should see net.tcp for port 808:*. If you don’t, click on the add button and add it. Later on in this post, we go into setting up bindings on IIS7 on Windows Server 2008. Anyway, when you setup IIS7 on your workstation, all bindings should have been created by default.
Ok, we are getting really close to fireing up our service. We just have to get the address of our service to feed to the WCF Test Client and then we are good to go. Here is how to do that. In IIS7, click on the website that is hosting your services and then in the center pane at the bottom click on Content View. Then find the svc file for your service, click on it and then click on browse. You should get something in your browser like the figure below.

If you got this, you are really in good shape, that means your site is setup correctly and you do not have any gross errors in your config file. What you want is the address up close to the top right after svcutil.exe. Copy and then pull up the WCF Test Client at C:\Program Files\Microsoft Visual Studio 9.0\Common7\IDE\WcfTestClient.exe. When you get it up, click on File and then Add Service. Past the address into the end point address edit box like the figure below.
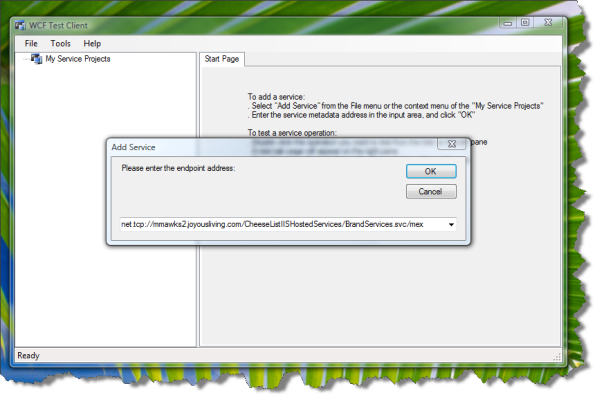
Then click on OK and after a bit you should see a dialog box appear with a progress bar saying “Adding”. When finished you should see your service under My Service Projects along with the service method. In the figure below, you can see my ListAll() method. I clicked on the listAll() method and then got a ListAll panel on the right. Then I clicked on the Start a new proxy checkbox near the Invoke button and then clicked on the Invoke button and got the result below (click through the security warning).

The results are the return of the BrandList object from the ListAll() service. If you click on the XML tab on the bottom, you can see the Request and Response messages. If you got this far, you are in really good shape. If not, please post your questions and I’ll answer them asap.
The next part of this post explains how to create an application server using IIS7 and the net.tcp protocol in your enterprise.
Every enterprise has its own security requirements and what configuration is necessary to meet those requirements. So, this article is not intended to be then end all and be all of security, however, for traffic within your LAN, it is my opinion that what we are talking about here will be reasonably secure.
Also, as pointed out earlier in this series, we’re not going into all the options available, but are pointing out one simple and practical approach. Resources for a more detailed discussion of options are here.
Ok, now on to the client. WCF services can either self host, or use IIS. We are going to look at how to host WCF Services with IIS7. We are also going to be using the net.tcp protocol to do it. The reason to use net.tcp is that by doing so you can expose your services equally to a web site or to a windows forms application. You can do it using http or https, but net.tcp is much faster, and although it is a little harder to configure, it is really worth it.
What we are doing here is to setup the service on its own machine and with its own domain. First thing is to create the DNS domain internally. The default domain on our network is joyousliving.com and we also use maltercorp.com equally. The Windows domain name is joyousliving.com. We also have a number of other domains as we host and do development for clients. We created a new domain called maltercorplabs.com and are using it for hosting services. However the windows forms desktop client is on the joyousliving.com domain. Below is a screenshot of the maltercorplabs.com domain after it was configured with the cheeselistiishostedservices A record.

The next step is to create the site on IIS7 that will do the hosting. To that, first you have to add the IP address you want to use for the site into your NIC configuration. I never use the default web site, and always add additional IP’s for each website I need. The screen shot below shows the configuration of the NIC.
To get there you go to Control Panel / Network Connections and click on the NIC you want to configure. Then click on the properties button and then on the Internet Protocol Version 4 item. Then click on the advanced button and on the top of the dialog box, you’ll see IP addresses. Add the IP there. Aftering adding the IP, make sure you can ping it from your workstation using the fully qualified domain name you setup in the DNS Manager. In this case it is CheeseListIISHostingServices.MaltercorpLabs.com.
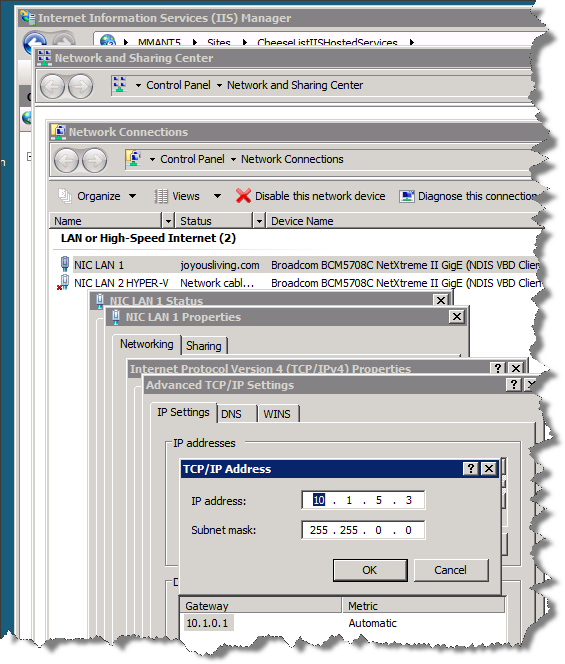
Next, create the actual site. My convention is to create a site name that is the same as the A record I created. Under binding make sure you pick the new IP Address you created and leave the rest to default values. We are going to go back and change a few things.
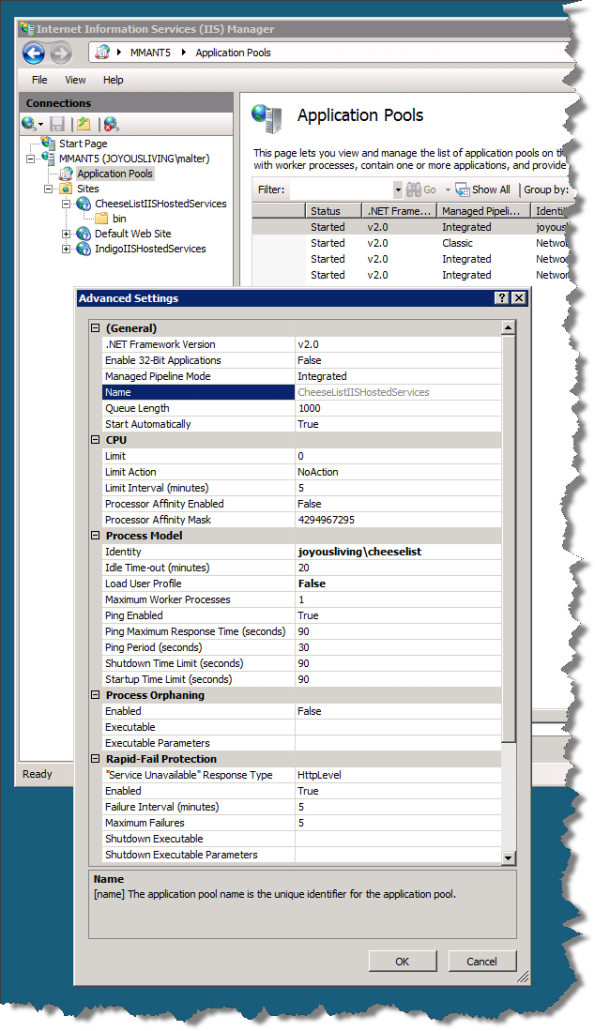
After creating the website, create an application pool where the Managed Pibeline Mode is Integrated. Now comes the fun and controversial part. I change the identity in the Process Model section from the NetworkService to something else. That identity is a regular windows login for each application. Users don’t know anything about it, it’s purpose is to be an administrative or application service account. This account is used as the identity of the website as well as the login to the database. We use an SSPI login to talk to the database so we don’t have to embed a login id and password into the web.config.
So, lets talk about this for a bit. What I want to do as an architect is balance security with maintenance and prevent deployment errors. So, I have at least three and sometimes 4 environments. Each environment will have a complete set of machines; database, web and or services.
- Development
- Integrated Unit Test
- QA
- Production
For each application in each environment, I will create a windows login. In each database I create a database role and then assign the application service account to that role. Each environment has the same database role, but each environment will have a different application service account. This makes it very easy to migrate database changes between environments; from dev to IUT to QA and then to production. I don’t have to make any manual changes to any script because I am granting permissions on the role in the database.
Then in any web environment where I am using SSPI logins, the identity in the application pool is what is used to login into SQL Server. Sometimes when moving scripts around, it is possible and likely that you will at one time or another, you will point to a database in the wrong environment. However having a different application service account for each environment will cause an exception to be thrown and you’ll know immediately that the name of the server is wrong.
The reason you need to care about the database login for the service is that we are wrapping an existing website’s dll’s and they need a way to login to the database. You could if you wanted create a different application service account to be used by services from the one used by the website. It does not matter as long as that user gets added to the appropriate database role in the right database and it is the same as the identity in the application pool.
It may seem like a lot of work to create so many users and to do this extra configuration, but you will be glad you did the moment your development process comes under stress. Its much better to see an immediate error telling you that you tried to get into the wrong database, than to realize that you have been pointing to the wrong database and now your data is screwed up, not to say what will happen with your credibility with the users having to re-enter data and trying to remember what they did.
So, right click on the new application pool and then click on advanced settings and change the name of the Identity to your application service account as shown in the image below.
After changing your site’s identity, you need to add a binding to support net.tcp. So, right click on the website that you are going to use to host the service and click on Edit Bindings. Then click on the Add button, and like the image below shows, select net.tcp from the dropdown and enter a port number followed by an asterick. I choose 808:*. then click ok.
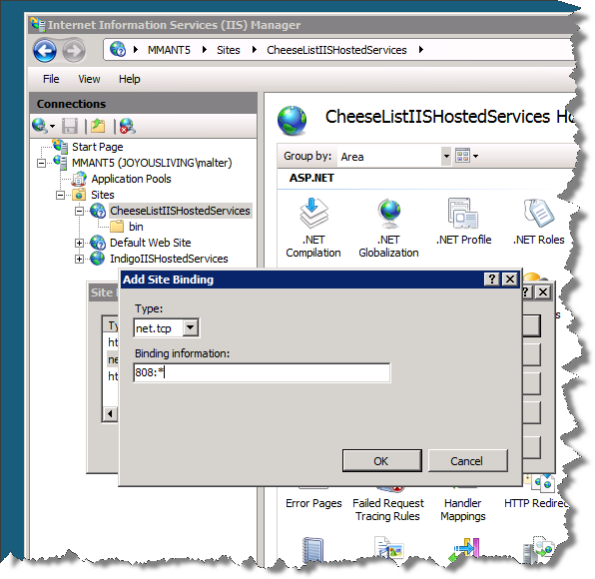
Now the website is setup with its own application pool and custom binding and is ready to be published to. So, lets put our programmer’s hat back on and open Visual Studio. We want to change the base address and point to the website we just set up, so change it from localhost. In my case the new address is net.tcp://CheeseListIISHostedServices.MaltercorpLabs.com/. Once you are done with the configuration changes, then go ahead and publish to your new server. You can test it just like you did when you were getting services to run for the first time on your local machine.
Ok, that is it for this part. There was a lot here, and I know this piece stayed pretty high level. Remember there are WCF Learning Resources here on the Computer Mutt. Also, if you have any questions, post them and I’ll answer them ASAP. Next up we will create a web and windows forms client. After that we will dive into transactions and then to exception handling.
Recent Comments